21 Feb 2017

Terrain and Scenery - Gamemat.eu Pre-Painted Desert Rocks Set

Hi Readers, thanks for dropping by. I saw these reviewed on Winters SEO You Tube channel, (BTW, check his channel out, great battle reports!) and I already had some Containers and the Battle Mat from Gamemat.eu, so I knew they are a good company. If you are in Europe or UK, check them out for Battle Mats and Scenery!
So this arrived, only a week after I ordered which is not bad at all from Europe.
The terrain is very well packed for transit.
Each piece is well protected and individually bagged.
Out of the box, the full set.
Here is the biggest Mesa piece. Space Marine for scale. A nice LOS blocking piece and a flat top for placing those Devastators.
The second largest piece, a Butte. Taller than it is wider, and great for LOS blocking too. Not too heavy, dense resin but slightly hollow I reckon.
Then the scatter pieces of rock, 5x2 sets of identical pairs, each turned around to show the different sides. These are all solid resin.
Two arched formations.
Two tall rock pillars, and the last two scatter rocks.
Two shorter rock pillars, shown next to one of the taller columns, and a Space Marine again for scale.
So, here is the whole set, that is a 6x4 foot table and this set alone provides almost enough scenery. Add a few buildings or some more terrain, a desert temple or something and you are good to go. Straight out of the box and a decent paint job, 9/10 for Gamemat.eu, the dropped point is only for price. I think its quite fair, decent detail and decent paintjob, but it might be out of some peoples budgets.
Oh, and the underside of the resin is smooth and painted so everything is steady and easily moved and won't damage your playing surface. Great product, I'm a very happy customer.

Cheers, Siph.

19 Feb 2017

Squaduary - Week 3 Progress - RTB01 Tactical Squad

Hi Readers, thanks for dropping by and checking out my progress. So, a little more done this week, two more Marines finished and a third at the highlighting stage. That's now over the halfway mark, 6 finished, 4 to go. Should have these all finished and showcased by the end of the month, easy. Thanks Squaduary, great motivation from reading other participants progress and seeing their squads come together.
For those who might be wondering what Squaduary is, its all about building and painting a squad in February and is a hobby related event being run by Stepping Between Games. A great way to get motivated to paint some of those miniatures lurking in the cupboard of doom To-Do pile.
Here's a close up of the newest members to this RTB01 squad, the old school Missile Launcher and a Bolter marine. I added a Bolt Pistol to the leg of the Bolter marine, and some spare missiles to the heavy weapons trooper. Missile Launchers are very meh... at least in my battles, but the rule of cool won for this squad, I had the bits so he had to have one.
Right, that's any tricky bits now completed, just Bolter armed marines left. It's a shame that when these were glued together half a tube of glue was over-used on each marine! They have needed a lot of filing and smoothing to get to this stage, but I think they look quite passable.

Cheers for stopping by, Siph.

16 Feb 2017

Legio Crucius - Reaver Titan - WIP #6 - Gatling Blaster

 Hi, Thanks for dropping by!

I'm making steady progress with the build, this time the left arm is ready for painting - the Gatling Blaster! I've been on the receiving end of Siph's Gatling Blaster, its great for taking out anything MEQ with AP3, as well as light/medium armoured tanks.
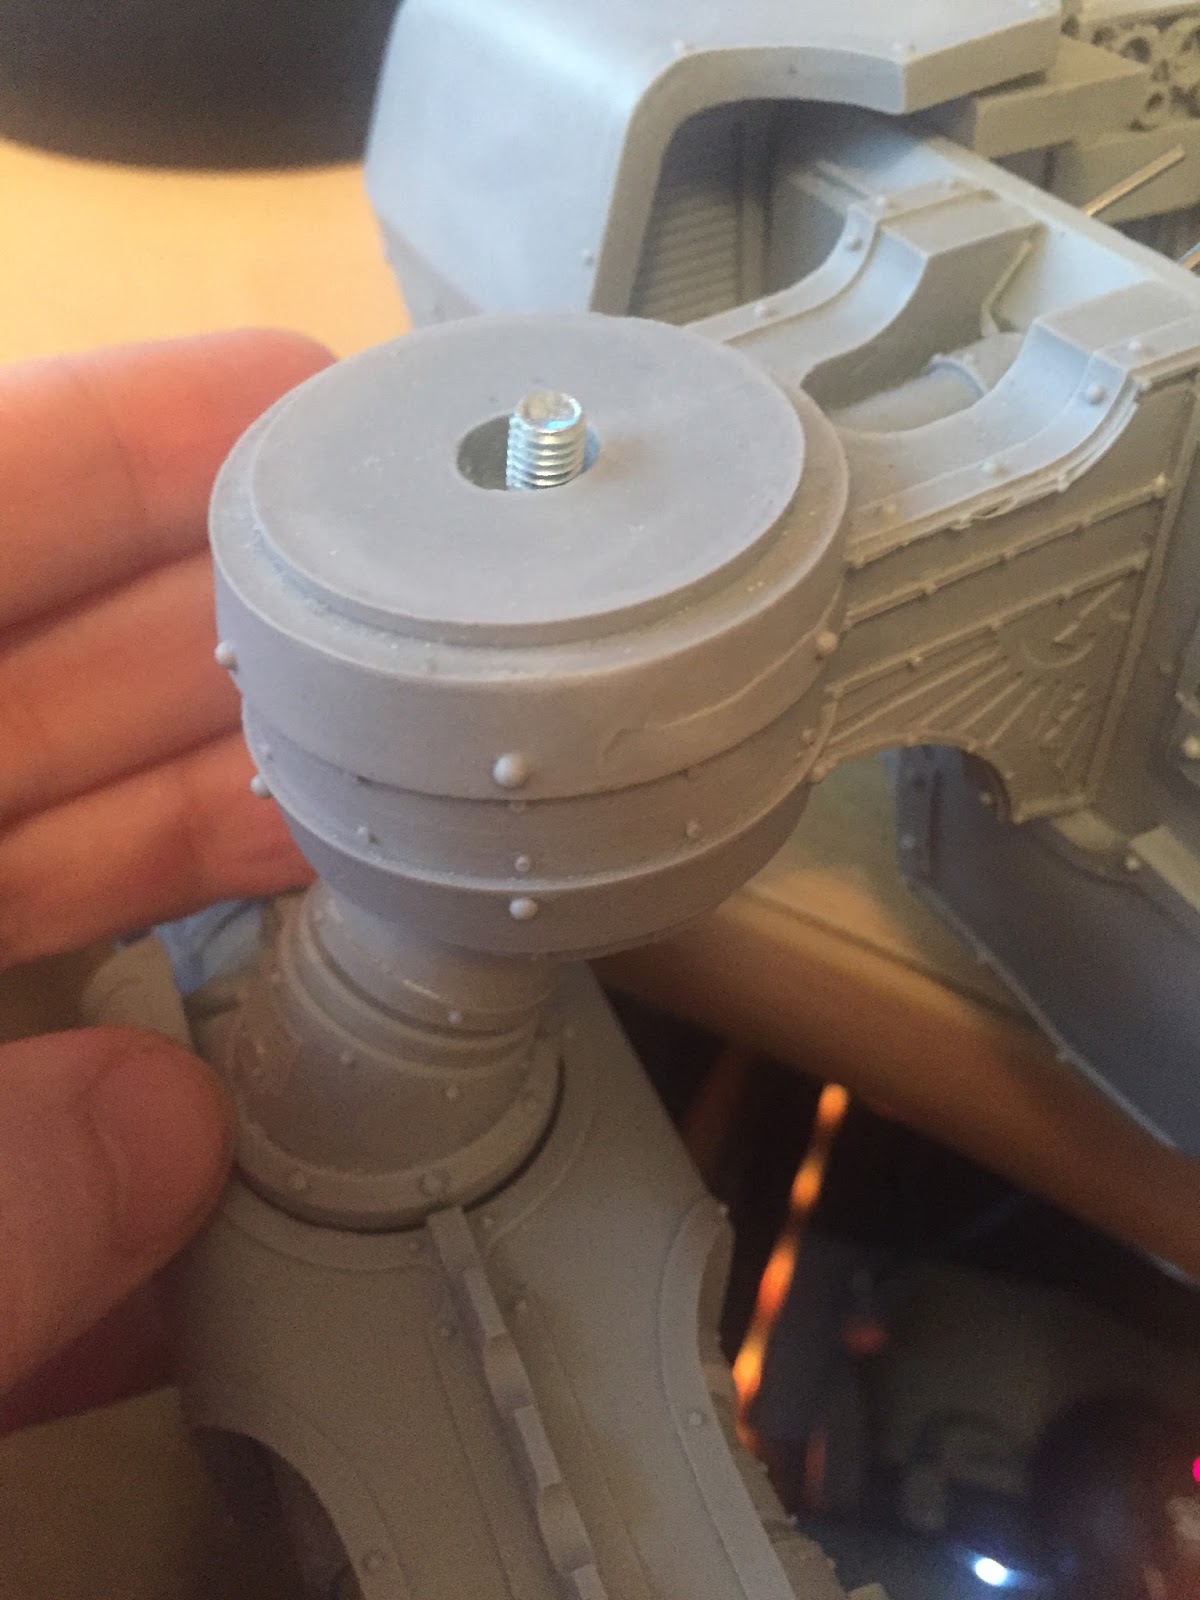
As the Laser Blaster, I've positioned a screw into the shoulder joint to act as the method to change the load out of the weapons. For this I used a drill to bore into the ball joint, and then glue the screw into place with JB weld.

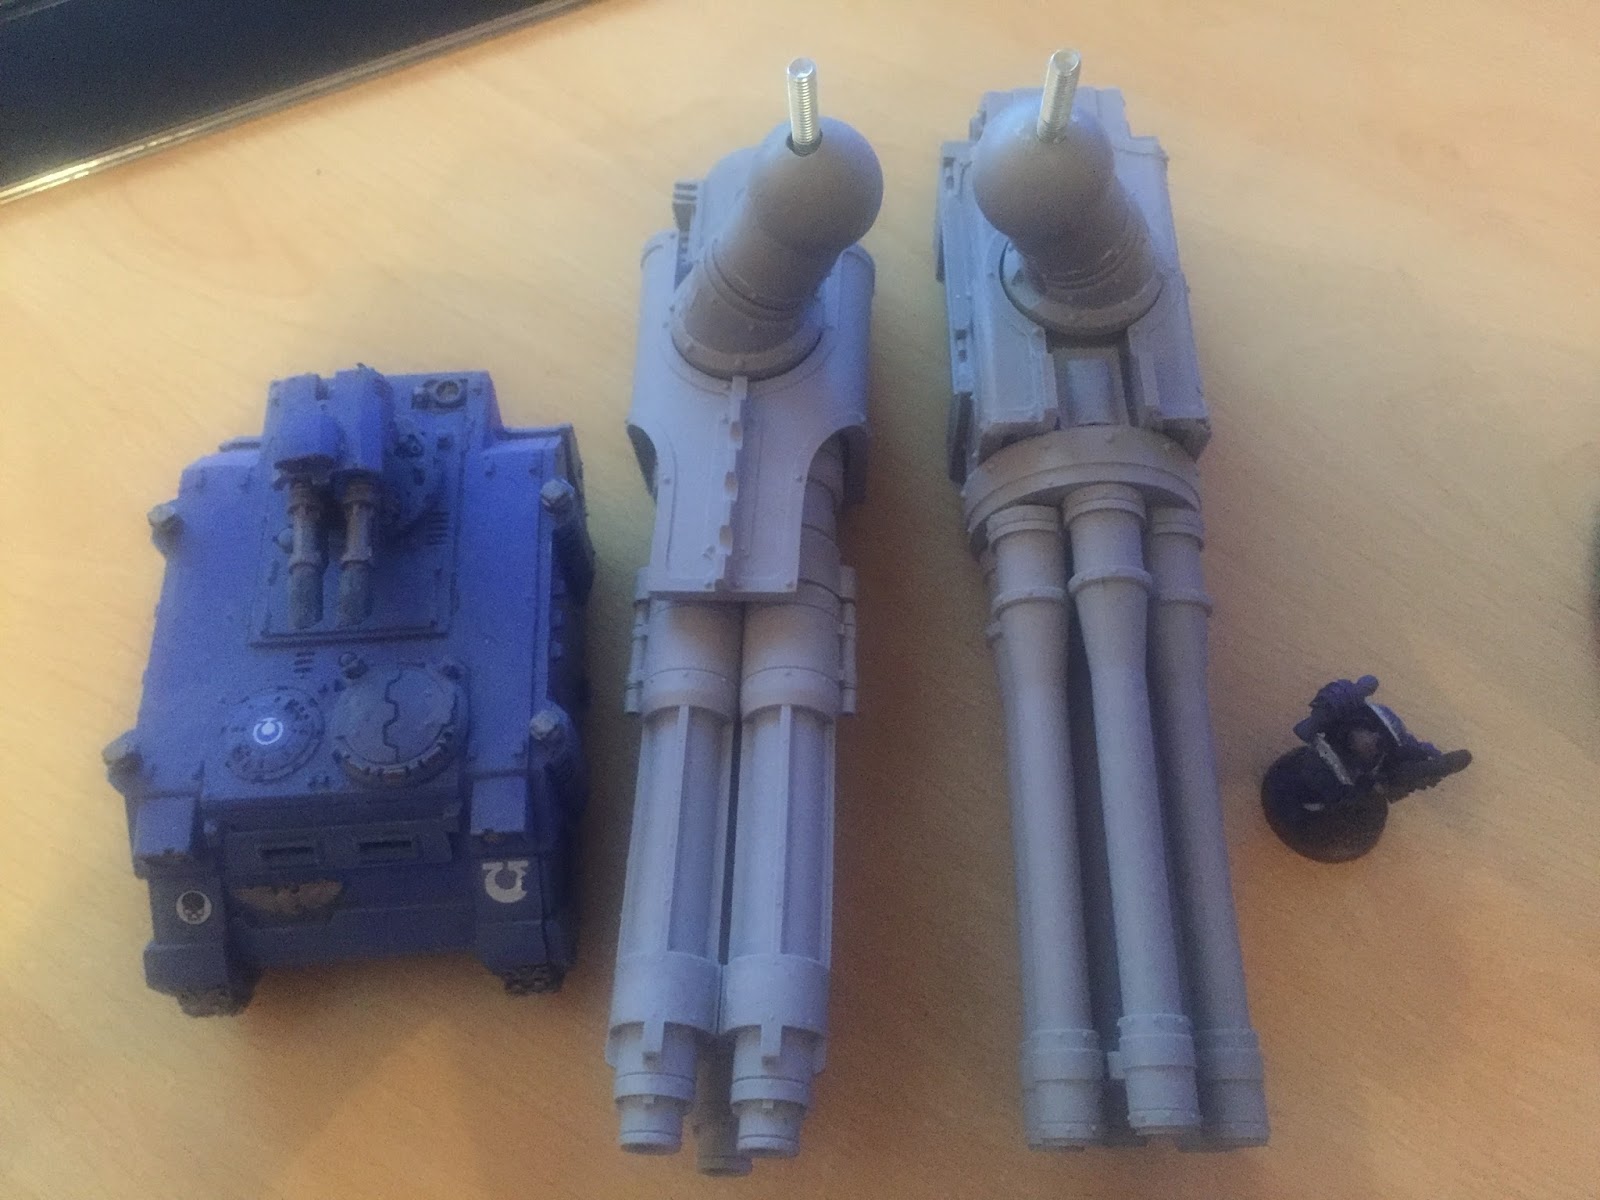
Below is a comparison of the two weapons side by side, some serious fire power there!
 And then two comparison shots next to a Razorback and Sternguard Space Marine.
The big reveal moment, here is where I'm at, the arms attached with the pauldrons in place, again the Sternguard and razorback are there for a size comparison!
It was asked in a previous post if I was going to sink the washers into place- I've had a look at this 
  an option, and have (at the moment) opted not to, I feel the shape of the pauldron hides the washer   
  well. 
Thanks for looking! Next post.. more comparisons.

14 Feb 2017

Mechanicum - Scyllax Guardian-Automata Covenant

Hello Readers, thanks for dropping by. Well, it seems I wasn't quite done with the Mechanicum units just yet, I forgot I had these... the Scyllax Guardian-Automata Covenant. I bought these ages ago with the view of using them as SM Close Combat Servitors, however now I have a Mechanicum force and hopefully GW will release the 40K rules for these, I may just use them as Scyllax.
In 30K these are 2A, plus one for Enhanced Array, so 3A, 4A on the charge, S4 T5 Automata which have Rad Furnaces reducing the enemy to -1 Toughness, close combat bodyguard guardians. The attack is only AP5, but the attacks can be swapped out for a 'dismemberment' attack instead, so that hits at S7 AP2 at Initiative 1 instead. They are also relentless and have two Wounds - they can be outfitted with ranged weapons and some heavy ones too. I kept them CC orientated.
The squad size can be increased to 16 and they can have a Triaros Armoured Conveyor as a dedicated transport.
I quite like the slug-like nature of these and I painted a slime/oil trail behind them. They will make cool CCW Servitors and hopefully a Mechanicum unit in the future. Only one more unit left for the Mechanicum forces I have, I also forgot I had a squad of jump-pack Ursarax I picked up at Gamesday (WarhammerFest), nasty buggers, Lightning Claw or Power Fist wielding 3W Jump-Pack nastiness.

Thanks for reading, cheers, Siph.

12 Feb 2017

Squaduary - Progress with RTB01 Tactical Squad

Hello Readers, I am continuing the progress of the RTB01 Tactical Squad I have pledged to get complete during February, in the Squaduary Challenge. Two more done, 6 more to go.
For those who might be wondering what Squaduary is, its all about building and painting a squad in February and is a hobby related event being run by Stepping Between Games. A great way to get motivated to paint some of those miniatures lurking in the cupboard of doom To-Do pile.
Here is the squad so far, finished the next two members of the squad now, both with a little character. The Grav Gun wielding RTB01 (I know! Awesome huh?) is armed with an alternative Gravity Gun from the 3rd Party company Spellcrow. Official Grav Guns are going for about £6 each on ebay, for about that, you can get 4! (5.80 Euro plus PnP depending if you live on this side of the pond...).

The other mini I completed this week was the Sergeant, a Power Fist wielding Veteran with a FW Bolt Pistol from the SM Character Upgrade set. The Power Fist is the original RTB01 set. The banner is made from an old metal pole (I think a SW Character) from by bitz box and a banner type bit I think from the Black Templars Vehicle Upgrade set.

9 Feb 2017

Legio Crucius - Reaver Titan - WIP #5 - Laser Blaster

Hi Everyone, thanks for dropping by!

Reaver post number 5- moving on from the legs and body, I've start work on the weapon arms. First up the Laser Blaster 3 Strength D blasts - Yes Please!

I wanted to be able to change weapons, as I'd like to have the options to swap out the configuration depending upon what I'm facing. I think the Laser Blaster will be one that is used often, however, I still like the ability to swap them out. I decided to go for a nut and screw solution, rather than magnets. I felt it was the simpler option than cutting the shoulder joint to position the magnet.
First think I did was to construct the weapon, then once I was happy with the direction it was to be pointing in- having the Reaver 'dry' fitted together, (leaning against the wall to prevent it falling!) and holding the gun until I was happy with the position- the next step was to mark on the gun/shoulder the point so that I knew how to position the weapon/.shoulder when it came to glue it, but also I marked the ball of the shoulder going through the shoulder support so that I knew where to drill the screw.
With this point I then put the shoulder joint into a vice and bore a hole for the screw to sit in snugly. Once I'd got a hole in the ball- I then proceeded to fill the hole half way with JB weld- then i pushed the screw into the hole- leaving it for 24 hours to set.

Below are a couple of images of the screw going into the shoulder support- and then secured into place with the nut and washer. I used a washer as I plan to magnetise the shoulder guard to secure it into place.

The shoulder guard had to have a hole drilled out to go over the nut, you can see in the pictures its a good fit now.

Which weapon will be next? come back next week to see! I'll post a pick with both weapons in position.

Thanks for swinging by!

8 Feb 2017

Alternative Sisters Of Battle - DreamForge Valkir and Statuesque Heads

Hello Readers, with the release of Imperial Agents Codex and no sign of plastic Sisters beyond Saint Celestine, I fancied some Sisters of Battle for myself. I bought two GW Immolators, Canoness Veridyan and a bunch of Dreamforge Games Eisenkern Valkir Heavy Troopers and some Statuesque Miniatures Heroic Scale Female Heads. Here is the result of the test scheme.
I'll be arming them all with GW weapons, Bolters from Betrayal at Calth etc to keep the GW vibe, but I love the look of my first Sister, I wish GW would re-design and put out plastic Sisters along these lines, Militaristic rather than boob-armour fetish troops...
The armour is simply Eshin Grey over Black basecoat weathered with a little Leadblecher; with Mephiston Red cloth highlighted Evil Sunz Scarlet. and some gold details - Gehennas Gold highlighted Auric Armour Gold. Simple to replicate.
The biggest joy of the Imperial Agents Codex is I can satisfy my hobby butterfly with various different squads etc without having to commit to an entire new army - so 25 Sisters, a Canoness and two Immolators will scratch my itch for Nuns with Guns. I can field alongside Inquisitor Coteaz and the few Grey Knights I have.

6 Feb 2017

Squaduary - February the month to get my RTB01 Done

For those who might be wondering what Squaduary is, its all about building and painting a squad in February and is a hobby related event being run by Stepping Between Games. The goal of the first week is to build your squad.
So I started a little ahead of some participants as I had painted 2 members of the squad already, seen here. As Thousandeyes says, there is no hard and fast rules, its a fun hobby motivation type thing designed to get those loafing minis done - right up my street on this year of cracking the great plastic and resin to-do pile!
As you can see the size difference is not too bad, the 32mm bases means they are beefed up a bit, and rule of cool wise, they will always be welcome additions on the battlefield!
Here are the rest of the squad, minus the specialist weapon carrier who is getting his Spellcrow Grav Gun fitted by the Artificers... should have these done for Squaduary.

Cheers, Siph.

2 Feb 2017

Ultramarines Fellblade, Typhon and Spartan - WIP

Hi, one and all,

I thought I'd post a few pics of my heavy support units for my Ultramarines- in the form of a Typhon, a Spartan and a Fellblade!
I really like the look of the Typhon - looking how I feel the vindicator should look, menacing with a huge weapon on the front. I've added the lascannons as sponson options to have some extra punch for dealing with tanks. To finish I need to add transfers, as well as honours and purity seals.
Next up the Spartan, another great looking tank, and rules wise is pretty good on the 40K battlefield. Like the Typhon I need to add honours to the tank, and transfers.

I'm looking at adding a touch of white to the vehicles - I've started adding white as a way of breaking up the blue, (see the Fellblade below) which I've also done for other models, including dreadnoughts and flyer's and really like the results.
The Fellblade I think has benefited with the addition of the white to break up the blue colour, again I'll be adding transfers and honours to the vehicle. I opted to paint the marines as veterans with white trim and helmets which works well with the additional white portion of the turret.  I'm also looking to further additions of weathering to the tracks and armour to all 3 tanks.
Thanks for looking... (more Reaver updates next week... :) Cheers, Lord Halfpenny (Half Painting Points for these - get them finished! - Siph)
Blog Widget by LinkWithin