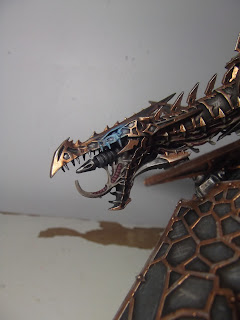
Boy this model is a doozy! I didn’t appreciate how big (and spiky) it was until I started building it. This one is just a standard build with no conversions – I will be getting another, so this was really an exercise in how it fits together and what is in scope to be changed next time; I’m thinking a new head and change up the position of the wings and legs…
The model is also a beast to paint – the second I glued it
all together I regretted not painting it whilst unassembled, although in the
end it wasn’t as bad as I first feared (definitely doable because the bits you can’t
reach also can’t be seen in detail). I’ll definitely give respect to anyone who
has done a good job of painting more than one of these those – curse those
wings!!! It took me around an evening’s painting to get down the gold vein
basecoat on one side of a wing – so four nights of painting gold veins. Then
another night of clean-up. Then another four nights of highlighting the gold. And
that was just the wings! Because I only have time right now to grab an hours
painting every other night or two – this model actually took me about 6 weeks
to complete.
I have tried to use blue glowing effects on the eyes and belly
to match the Forgefiend and plasma weapons in the rest of my army and I think it’s
starting to get neater.The base was pretty fun – seeing as it only needs to hold a flight-stand, there is loads you can do with it. For a start, the base is made from about an inch of polystyrene, carved to shape, sealed with PVA and sand and a cross cut into it for the flight-stand. I’ll definitely be doing that on similar bases because it means you can slot the flight-stand into the base and model and it holds without glue – so great for transporting.
I decided early on that I wanted a pit filled with smouldering bodies; as if a pile of (imperial) corpses had been burned (might be a little morbid looking back now…). I used zombie models from the Zombies!!! board game (you can buy a bag of 100 for £10). The models aren’t great and are all the same pose, but I cut some up, repositioned a few and finally held them over a lighter so they twisted, contorted and the surface bubbled a little.
Anyhow, I am pretty happy with how it turned out – comments and suggestions on how to improve the next one are appreciated as always.
P.S. Just thought I would mention that these guys live up to
their rep on the table – you HAVE to prioritise and kill them the turn they
arrive or they will make a mess of your army…doubly so if you are running power
armour (in BW5 my Heldrake got taken down immediately in game 1 but in games 2
& 3 went on to massacre about a third of each opponents army).


Looks the absolute business! The blue glow effects, the little scratch highlights on the wings, the base – all look truly awesome, great job! I have one in the box, ready to build for my IWs and your post has been really informative, especially with regards to painting in sub assemblies... but your heads up on total painting time is giving me the heebie jeebies ;)
ReplyDeleteVery nice! I am liking the glow effect detail you have done.
ReplyDeleteGreat Job Fella... I've just painted a rather nice easy to do flyer in a day! Ha. It's scheduled to post whilst I'm away.
ReplyDeleteGood stuff tho, I'm loving the Iron Warriors so far, and the glow effects and OSL is brilliant - you'll have to teach me.