29 Jan 2016

Legio Astorum - Warlord Titan Build - WIP #13 - Secondary and Tertiary Weapons

Hello Titan Enginseers and Readers, Thanks for dropping in. With the Titan Superstructure mainly completed I turned my attention to the Secondary Weapons as I am awaiting the release of more FW Arm Weapons before committing to Arm-ament... sry ;)

Check out a recently finished Legio Astorum Warlord of a blogger buddy GunGrave at his blog A Gurdsmans Guide To Glory

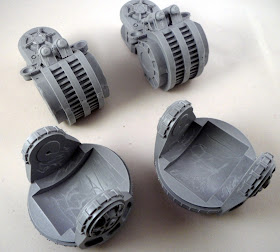
I scored the Carapace Reaver Laser Blasters where the glue would go to provide a better surface area for bonding and then applied the JB Plastic Weld.
I clamped the two pieces together whilst the epoxy set, and left overnight. Not forgetting to glue the Barrel Support to one of the barrels as per the instructions.
Whilst the main 'Secondary' weapons were drying, I assembled the Mauler Boltcannons and TL Lascannons - yes the Titan has the armament of a Landraider as secondary weapons ;)  These could then be left separate from the titan for ease of painting later. The guns were slotted into the mounts but the base plate of the mount left separate so they can be affixed to the Titan Weapon Mounts after painting.

The Main body of the Laser Blasters sits in the Weapon Mount, and the Piston Assembly out of the box sits nicely in place without the need for clamps or trimming, so I glued these parts together in one sitting (no photo) and left to dry, gravity doing the hard work. The pistons which held the barrels in position were then glued in place later - I was going to leave off for painting but had some spare wet epoxy at some stage, so went ahead and glued after the barrels were in place. Below you can see the Weapon Mounts in place and no pistons.
Once the main body and Mounts of the Laser Blasters were dry, I set about gluing the Barrels, using the single Barrel with the Barrel Support attached and some elastic bands, the Barrel slots into place nicely and didn't require fiddly pinning, the JB Weld is far stronger than required and no weight will be pushing down on the barrels, plus once all three are in place, they support each other. This was left to dry overnight.
The other two Barrels slot into place and use the Barrel Support as a guide, a simple rig of elastic bands held them in place until the next day. Here you can see the pistons in place also, using some left over epoxy from the barrels. There are two ways you can fit the pistons, both 180 degrees from each other, one way is incorrect, be careful and dry fit the curved piston ends into the lugs on the Mount and Barrel Assembly and see which fits flush better.
And here are the Secondary Weapons (and maybe Tertiary Weapons) for  the Warlord. I have left off the power cables for ease of painting later. Lastly, I inserted magnets into the Shoulder Mounts and the base of the Weapons so they fit firmly in the mount but can still be removed and swapped or trained onto the enemies of the God-Emperor...
These are 7mm x 4mm with a countersunk 2mm hole for extra surface area to glue. Not enough to hold the weapon on if tipped upside down, but enough to stop the weapon tilting on the mount.

Thanks for dropping in. Not much basic construction left... The main arms when bought will be a similar method, and I will post how I mount them into the Titan arms in due course!

Cheers, Siph.

A useful link to the Warlord Titan Construction process can be found HERE.

27 Jan 2016

Dark Angels Interrogator Chaplain Seraphicus from Dark Vengeance

Another update post of stuff in the to do pile in-between doing Titan stuff. This was a purchase I made on a whim from Blogger Pirate Viking Painting back in 2012 and since has been sitting around on display but with a different style base... maybe it was my mild OCD but the 32mm Base Adapters I got from Tabletop Adapters were the perfect excuse to fix this and make his base match my own.
Hey ho, not really an update of sorts but back to Titan Building, nearly there on the construction front, some weapons in the next post. Thanks for dropping in. Siph.

25 Jan 2016

Legio Astorum - Warlord Titan Build - WIP #12 - Top Carapace

Welcome back Titan Enginseers, nearly there with the main construction of Dominus Victoria. With the rest of the Torso now dry and firm and all pinning in the interior done, I went ahead and sealed the Torso with the 'lid' Carapace. To do this was a simple slot into place, however I used the Exhaust Ridges in place to make sure I was correctly aligning everything and the Ridges would then fit correctly when the next stage is fitting them. Don't glue the exhaust ridges in place yet, one step at a time - it's the journey, not just the destination Titan Enginseers!
The Exhaust Ridges received some small magnets into the Void Shield Projector housings and into the base of the Projectors, this will enable me to remove the requisite amount of Voids in games, and replace as necessary when I successfully regenerate them, rather than using dice (and it makes it easier to handle the build too). This will also have the added benefit of helping with painting the details.
As you can see the Void Shield Projectors fit nicely along the Exhaust Ridges. I clamped and glued the front Exhaust Intakes to the Exhaust Ridges as per the instructions prior to fitting on the Carapace, making sure they align along the bottom forming a smooth curve, use the Torso and Carapace as a guide if necessary, or I did it by eye and clamped in place overnight..
Once the Carapace lid was dried and firmly fitted to the Torso, the next day I clamped one of the constructed Exhaust Ridges into place along with the rear Exhaust Vents as these two slot into each other and best to do at the same time - makes clamping angles and rubber bands essential, however is a great step forward in completing. Make sure the rear Exhaust Vents align properly with the rear of the Torso to make the opening for the Exhaust Rear Plates.
After a double check of all the alignments, these were left to dry overnight. The next day I did the same for the left hand side Ridge and Vents. Once all these were dry, the following day I added both rear Exhaust Plates sealing the Torso section.
The Torso Complete
Rear Exhaust Plates seal the Torso Exhaust Ridges
The completed Torso in all its HUGE glory, the Titan is massive and heavy, but well put together and firm in all places, I am confident this build will be strong enough to withstand gaming.

Thanks for following the build so far and stopping by to take a look. I intend to do a compilation post linking back to all the Titan WIP Build posts for your ease of reference if you plan a build yourselves, alternatively click on the label 'Warlord Titan' in the sidebar. Cheers, Siph.

A useful link to the Warlord Titan Construction process can be found HERE.

22 Jan 2016

Relictors Spacemarine Shadow Captain Solaq

Hello Kind Readers, all is not forgotten with regard to my Relictors. Amongst the titan build I haven't forgot the actual Weemen... Here is my latest offering towards the Battle Company, another Captain but a nice one. This Captain is found in the Shadow Force Solaq boxset from the Damocles Warzone set of two, the other being the Tau.
I substituted the Plasma Pistol out for a Storm Shield to make him more survivable and hopefully either with a Power Sword or Relic Blade plus his Bolt Pistol, he can make a good fight of it.
The Storm Shield was a third party creation bought a long time ago and waiting for the right miniature to be used, I thought it would look good on this particular Captain as he has wing/feather-like icons all over. I am rather pleased of my brushwork this time, I am showing improvement with age, lol. The feathers, gold and cloak are all quite good I reckon.
There you have it. Right back to the Titan build in earnest... but a nice small scale break from the massive build. I really enjoyed this little diversion.

Thanks for dropping in. Siph.

20 Jan 2016

Adeptus Mechanicus Skitarii Sicarian Ruststalkers

Hello Readers, more completed models from the back catalogue of purchases, these are from the Blogger Buddy Bulk Buy I made from my blogger buddy Mordian7th. Adding to the Onager Dunecrawler and the Cult Mechanicus models I already have.
This is all Mordian7th's work, I just re-did the bases to match my own models. I like the gloss black look of the Ruststalkers heads best.
Well, a quick post of my updates, still working on the Warlord, update post on that soon. Thanks for dropping in. Siph.

18 Jan 2016

Legio Astorum - Warlord Titan Build - WIP #11 - Pinning Shoulder and Arms

Welcome Titan Enginseers, thanks for dropping in. Another quick post about the Warlord. This time, just a quick update and an important one. This is how I will ensure the arms are fully supported. I already spoke about the triangle arrangement FW designed into the titan for the Shoulders, so the arms won't droop, but here I am backing it up with a pin right through linking four major components so the arms are as strong as can be.
Here is the drilled hole, using the entire 11cm drill length of my 2.5mm long drill bit I can get the pin to link through the Shoulder Mounting Assembly, through the actual Shoulder, into the Upper Arm Joint and into the Upper Arm itself - I am pretty sure the JB Weld will hold but this can only help.

You can also see the fitted Arm Pistons mentioned in the last post, all dried and reinforcing the arms further.
And all to show is a small hole in the Shoulder Mount Assembly which will be green stuffed and filed smooth. All that is left for the Torso now is the fitting of the Carapace 'lid' and the venting and void shields. Waiting for magnets to arrive first so I can think about mounting the head and neck joint with magnets, either a straight drill through or like the Waist, a small cavity job? I'll wait to see how strong they are and go from there.

Cheers for dropping by. Siph.

A useful link to the Warlord Titan Construction process can be found HERE.

15 Jan 2016

Legio Astorum - Warlord Titan Build - WIP #10 - Arms

Welcome Back Readers, Thanks for dropping in for the next installment of the titan build. Here I start the arms, I have already glued and dried the Upper Arm Pistons to the Upper Arm. Next, the Elbows are glued and clamped to the Upper Arm assemblies.
Once dry, the next day I can Arm assemblies into the Shoulder Joints, after roughing up the surface to maximise the surface area for the JB Weld to affix to. There will be a lot of weight pulling this join apart with the weight of the Titan Arm Weapons below it.
To assist the glue, I clamped the sides onto the Upper Arm so I have now three surfaces of glue affixing the arm into the socket.
The alignment of the arm and Shoulder Joints should be either 90 degrees or more so the arms hang down vertically or out at the sides a little, here is the 90 degree one. I then drilled the pin holes for making the arms supper strong.
Here is a shot of the pin going in place, through the Shoulder Joint and into the Upper Arm. The whole Arm will be further pinned from a pin reaching through the entire assembly from the Shoulder Mounts, through the Shoulders themselves and in through the Shoulder Joints and into the Upper Arms. I am planning on magnetizing the weapons in place using a magnet up in the lower arm coupling and in the top cog of each weapon - yet to purchase the Arm Weapons.
The arm assemblies were then glued and clamped into the Shoulder and at a slight angle, so the weapons would point out at the front of the titan roughly ten degrees from straight forward - test pose this desired angle before gluing and clamping in place. Once dry, you can go ahead and glue the two sets of Shoulder Pistons.

Cheers, Siph.

A useful link to the Warlord Titan Construction process can be found HERE.

13 Jan 2016

New Year, New Army - Vior'la Sept Tau


As GW was selling some great value New Army bundles, I bought a Tau one along with several other kits and the Damocles Infiltration Cadre. The scheme being tested here was meant to be the Stealth Suit version of more camouflage version of the Vior'la Sept White and Red, however, I liked the Zandri Dust colour so much, I will do the whole lot in this colour. A few units may receive the White and Red however the Codex states that the red markings are Vior'la, the armour plate may be coloured wherever the Sept is fighting, green in jungle worlds, grey in Urban zones, so the Bone/Brown colours suit my terrain and colour of the earth - Calthan Brown (Mournfang Brown).

I chose to do the 'metallics' black and grey as a departure from my normal SM Leadblecher, setting these Tau apart from human technology and copied the gold gyros from the GW normal to add spot colour to an otherwise 'drab' colour palette. The touch of red Vior'la Sept marking lifts the scheme too. Blue energy also emanates from lenses and energy couplings/vents etc.

The fatigues can be base coated with Mournfang Brown spray and the vehicles Zandri Dust to match the armour, now GW has decided to produce spray Zandri Dust once again. I was going to do the 'back pack' Zandri dust, but as these are stealth teams, they will remain brown. The base is finished as my previous bases, Calthan Brown, Kommando Khaki/Ushabti Bone drybrush, linking in the camouflage scheme to the environment nicely as I have used both those colours as line highlights.

Thanks for dropping in, cheers, Siph.

11 Jan 2016

Forge World Greater Brass Scorpion of Khorne

Hi All,
I've recently had the pleasure of painting and building a Greater Brass Scorpion of Khorne. I've got to say this was one of my favourite kits to plan, build and paint. I had always really liked the FW, heavy metal team's Brass Scorpion, loving the paint scheme. I know I'm nowhere near that standard, however I wanted to test myself. The other major point is that I do not currently own a spray gun- thus I wanted to see what I could do without one!
The Scorpion was washed and prepared as per normal FW kits. I then checked to make sure all the parts fitted correctly as well as making sure all parts were present!

I am one of those builders that prefers to build the entire kit, or to utilise sub assemblies. However the Brass Scorpion is probably best done as independent units. The only portion I initially built the body, however all armour plates and legs/arms were left to be completed separately.

Using Black spray to undercoat all parts, I then sprayed the parts with a combination of brass and silver from spray cans. The Brass covered the entire model, and the silver done to not completely cover the Brass underneath.

I then did something I don't normally do - I would have normally dived in and started painting armour panels and legs all in one go. Instead, I painted up a single leg piece to see, a) whether I could achieve the scheme I wanted, b) How the scheme would actually look. I made a list of the colours used to make sure I could repeat the process.
The scheme was them applied to all the other armour plates and legs/body etc. The scheme was:
  • Base Chaos Black spray
  • Brass then Silver model spray
  •  Mephiston Red lines within the armour plate showing Silver 'circles' from the undercoat
  • 2 coats of Carroburg Crimson Wash
  • Wash of Bloodletter Red Glaze
  • Evil Sunz Red within the Silver circles, showing some of the Silver as edges to the Evil Sunz
  • A wash of Agrax Earthshade
  • Wild Rider Red stippled within the Evil Sunz red circles
  • Wash of Agrax
  • Final wash of 'ardcoat
For the Brass edging i used a simpler pallet of colours:
  • Brass Scorpion 
  • Nuln Oil Wash
  • Highlighted with Leadbleacher
The cabling section was a double wash of Nuln Oil over the Silver/Brass basecoat. All weapons were picked out with black, then highlighted with a light dry brush of Leadbleacher. The bodies within the cabling were picked out in Codex Grey, then washed with Nuln Oil, then grey highlighted, and then a final wash of Tharaka Green - to give them a deathly pale complexion. The model had its claws covered with Blood for the Blood God Technical Paint to give it a 'Blood for the Blood God' feel - with freshly spilt blood from its latest victims.
Overall I'm really happy with the final look of the Scorpion, it reflects light differenetly as the light catches the armour plates at differing angles, which was something I was hoping for. I'm glad I took the time to plan this project, and feel that it is reflected in the final look of the model, and photographed in my new Foldio2 light box, cheers Siph ;) I hope you like! Thanks for dropping by.

8 Jan 2016

Terrain and Scenery - Promethium Relay Pipelines

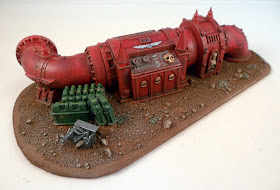
Hello Readers, whilst at Warhammer World in November I picked up a set of these Promethium Relay Pipes to add to my vast Terrain set - never have too much to choose from. I decided that I would construct the pieces (4 Large, 4 Small) in four sets as the rules say you need to field them with at least one other piece anyway. And the scheme followed on from my Fuel Storage Tanks and the objective marker Fuel Dump.
This is the Command piece I guess where you control the flow rates etc. So I made a dump of fuel cans and a tool kit to siphon off the fuel. This rule set allows Flamers to gain Torrent when near the pipes. The paint job was a Red Halfords Primer followed by Tornado Red Halfords car spray, washed with heavy wash of Nuln Oil and drybrushed with Macharius Solar Orange Foundation Paint and then Leadbelcher. Real quick and easy.
I like to base the Terrain I have, but I wanted then to still connect properly so I made the bases smaller than the ends of the pipes to allow overlap.
This is the only single piece I have. But it has a three way choice of where it connects to other pieces.
One broken pipe, actually two pieces, one large and one small. I weathered the ground around the break so show burnt/polluted earth.
Here is the second broken pipe pieces.
All the pieces together.
And a shot with the Fuel Dump and Fuel Storage Tanks.
And if you were wondering, the rules are easily found under the pump controls, thats why I had space for the fuel cans! Points value scored out for copyright reasons but only as much as a Terminator, not bad for 4+ cover save and Torrent Flame Weapons, my Relictors (Salamanders) Vulkan He'Stan approves. Thanks for dropping in.