31 May 2019

Legio Crucius - Warlord Titan - WIP #6 - Getting there

Hello one and all,

To follow on from the last Warlord post, ( https://weemen.blogspot.com/2019/05/legio-crucius-warlord-titan-wip-5.html )
I've made steady progress with the Warlord, The body has had a complete wash of an agrax/medium wash, then a highlight prior to adding all the armour panels. These have been fixed into position. Details and highlights are to be added to complete.
The head has been magnetised into position, and I've wired all the LED's in to position through the head into the Torso. Prior to this, all the crew were painted and added into position. The head was positioned so that he is looking in the same direction as the Sunfury weapons. Each LED has its own power supply, so at the moment I've got 6 power packs inside the body, with an addition 6V power pack for the smoke machines I've added to the vents (see these next week...)
I am really happy with how the overall appearance of the model, the project has taken just over 2 months to get to this stage. The weapons need completing, as do the final washes/highlights on some of the panels. I am hopeful, and confident that the model will be complete for the Titan Owners Club UK Walk at the end of June.. LH

Warlord Hell's Daughter will Walk at the next Titan Owners Club UK event, where she will be battling alongside 80 other Titans! Remember to register your own Titans at Titan Owners Club, and if you want some cool Titan Owners Club merchandise we even now have a Spreadshirt Shop, any profits go to buying Titan sized terrain for future Walks :)

27 May 2019

Legio Astorum - Warlord Titan Build - WIP #27 - Sunfury Plasma Annihilator

Hello Titanseers, I am progressing well with the Warlord, still on target for the end of June for the Titan Owners Club UK Walk.

The link to the whole Titan Construction process can be found HERE.

The easiest way to get to all the details is paint the four Plasma coils separately, I added some Nihilakh Oxide to the bronze to give an aged Plasma weapon look.
The coils were basecoated with Kantor Blue, I finished the small coil parts that are half hidden - they can be seen when constructed.
The coils were drybrushed with the paints shown, the Kantor Blue base means no wash is needed before overbrushing the Turquoise Sotek Green followed by Temple Guard Blue - then Baharroth Blue, Ulthuan Grey and finally White Scar.
The whole kit goes together really well, except the targeter piece which needs some work to get a tight fit. I made the rails bronze too, to continue the aged archaic look.
The rear assembly is best constructed with the cables separate. I added some small transfers from the AdMech sheet, warning triangles and makers marks which double as warning labels on the Plasma Canisters.
The skull kill markings were from the Baneblade kit. The rear capacitor section was also given the aged bronze look.
The barrel assembly was glued and pinned to join the two halves and clamped whilst the JB Weld dried.
All the parts prior to assembly, you can see the trim is yet to be completed on the rear assembly.
From the artwork for Adeptus Titanicus the four smaller 'barrels' are depicted as laser sights so I painted them as such.
Here is the mighty plasma gun constructed and decals finished. Awesome hefty hunk of resin!
Here is the Sunfury Plsma Annihilator on Dominus Victoria.
I love the look of the massive plasma coils and the aged look - worthy of technology lost to the Dark Age of Technology, I was worried about having blue coils with a mainly blue titan but I like the finished colour and it matches the Plasma Blastgun of Warhound Canis Bellum.
Getting there, nearly done. Still have the Greaves on the lower legs to do as well as the shoulder Pauldrons.
Sunfury and Volcano completed - Marine for scale...

Dominus Victoria will Walk at the next Titan Owners Club UK event, where she will be battling alongside 80 (yes 80!!) other Titans! I will be sure to post lots of photos.  Remember to register your own Titans at Titan Owners Club, and if you want some cool Titan Owners Club merchandise they even now have a Spreadshirt Shop, any profits go to buying Titan sized terrain for future Walks :)

Cheers, Princeps Siph :)

24 May 2019

Legio Crucius - Warlord Titan - WIP #5 - Further Progress

Hi one and All.

Quick Warlord update.
I've got the lower parts virtually done, a wash over 2 plates, and then a highlight as well as cable details to complete prior to them being completed.
The legs have had a wash with a Agrax/medium mix, I did this mix in a spare part to make sure the consistency was the same across the whole batch. This helped to prevent the wash forming puddles. once the wash was dry the entire section was drybrushed.
The only 'modification' I've had to make is the right lower leg guard. Due to the pose the armour plate was sat too low, as it was both forced against the other armour plates behind it, and was flush against the floor. Thus I've attached the guard slightly higher. which doesn't look out of place.
The 'toes' like the Warbringer have had gold detail trim added. I was toying with leaving it silver/agrax, however i am glad i took to the time to add the trim.
Left to do is a wash over the torso, then detail and highlight. The armour panels are all complete. From a weapon POV, the missile launchers are 90% done, with the Sunfury's 75%. Hopefully the Warlord will be complete before the end of the month..

LH

20 May 2019

Legio Astorum - Forge World Warlord Titan Build - WIP #26 - Custom TitanOwnersClub Decal

Hi Titanseers, my bestie Lord Halfpenny printed some custom decals of the glorious Titan Owners Club logo of which we are both registered owners and Admin Staff, and the Warlord Dominus Victoria is No.104. I wanted to acknowledge my kinship with these great hobbyists by flying my colours proudly on the armour. I thought I'd share the method for applying your own decals - you can print your own design on a printer using decal paper.

The link to the whole Titan Construction process can be found HERE.

Above you can see the decal cut out from the sheet, carefully traced around the edges - the cut-out is then used as a stencil to apply the white background the decal needs to show the colours - only professional decals have a white opaque layer onto which they print the colours. Without this base coat the underlying  blue would dull down everything.
The over-spray was carefully blocked out, neatening up the edges of the decal position. 
The decal was then applied, noting the small amounts of white showing around the edges and in the nooks and crannies.
When dry and dabbed down, the whole decal and surrounding area was 'Ardcoat gloss varnished for protection. I feathered the 'Ardcoat out at the edges so no visible line will be present once the shine is knocked back with Matt Spray.
And the finished decal, the white edges have been painted blue, the small areas of white in the crevasses (top of 'T' and inside edge of Banner) and then the whole area has been sprayed with two coats of Army Painter Matt Varnish Spray. A fine addition to the Titan's colours, and when completed the whole titan will be sealed with some Halfords Lacquer spray seal.
A quick update, I am plodding away with the remaining pieces, I can see the finish line now, just a month and one week to go to the Walk of Dominus Victoria's debut!

Dominus Victoria will Walk at the next Titan Owners Club UK event, where she will be battling alongside 80 (yes 80!!) other Forge World Titans! I will be sure to post lots of photos.  Remember to register your own Titans at Titan Owners Club, and if you want some cool Titan Owners Club merchandise they even now have a Spreadshirt Shop, all profits go to buying Titan sized terrain :)

Cheers, Princeps Siph :)

17 May 2019

Legio Crucius - Warlord Titan - WIP #4 - Progress

Hi One and All,

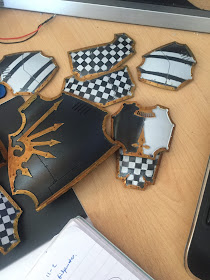
Following another night away from work, I took a load of Warlord panels, and weapons with me to work on. I've added a wash to the gold trim, and now the panels are ready to be added to the body. Once here I will add highlights to the trim where required as some of the panels will be hidden or under other plates, thus no highlight would be needed.
Due to the shape of the head the checks haven't come out as true as I planned. Once I've finished the gold trim I will go back to the checks and tidy these up.
44 days until the walk to go... LH

13 May 2019

Terrain and Scenery - Blastscape Ruins

Hi All, I've painted up some more terrain to add to my collection, this Blastscape has been loafing in the to-do pile now for many many years, I thought it was about time to get it finished and 8th Edition cover rules for area terrain gave me the push to get this piece completed.
I went for a very long abandoned Rhino, with paint stripped back and rusted. I added a few spots of colour with the blue Power Armour for Lord Halfpenny;s Ultramarines, the optic prisms and some burn marks and bare metals from the weapon holes.
For variation, I kept the base rock grey and added some scorch marked debris in the craters and burnt tree branches. The few dead Imperial Guard are painted the same scheme as my Genestealer Cult.
A few patches of grass and tufts were added to the usual recipe for the soil.
Rather pleased with the overall scheme and the match to the terrain on the BattleMat (from GameMat.eu) and another piece off the to-do pile, only the Temple Of Skulls yet to do from my terrain and then I can move on to some Necromunda or Adeptus Titanicus terrain when I fancy it.

Cheers, Siph. (5 painting points for Terrain)