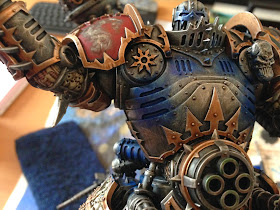
Hi guys, the6thdegree here - we've had a couple of people comment on how I do glowing effects (including Siph), so I thought I would throw up a quick tutorial. Luckily I had a spare model lying around that needed some glowing effects...
Bit of a caveat - I'm not saying this is the best or only way to do it - its just how I do it (and its pretty easy and doesn't require an airbrush).
Lets start off with the paints:
They are all citadel paints and although aren't the newest range, you can get the idea of the 3 shades being required: Regal Blue, Enchanted Blue, Ice Blue and Scar White.
Starting with the darkest blue (Regal Blue), paint in the source of the light (this is to make sure the light source has the colour in from the start - after this point its all drybrushing).
Using a drybrush from here on out, drybruh on the darkest blue, brushing away from the source of the glow in the area you want the glow to be seen - this needs to be painted on as far as the glow effect is going to stretch, because we are going to work our way back in with the lighter colours. Remember the glow will be in 3 dimensions, so you want to catch parts of the model that would be naturally hit by the light.
Next up, drybrush on the middle blue (Enchanted Blue) in the same way as before, this time not reaching out as far as before. You still want to hit those parts of the model that are going to be reached by the light, but just apply less of it.
At this point you can jump straight to the lightest blue (Ice Blue), but I like to mix the middle and lightest blues to help the transition a bit more - I find that the effect really starts to pop with the lighter colours, so I want to work my way up to them a bit more gradually.
At this stage I am just using the lightest blue (Ice Blue) and am trying to stay closer to the source of the light (but still clipping those parts of the model that will be reached by the glow).
At this stage I am now mixing the lightest blue with white (it should be obvious, but throughout the drybrushing steps, I am not cleaning or changing my brush). Now that we are working with the lightest colour, make sure you are getting it on the actual source of the light as well as radiating from it.
Here I am just using pure white - so probably the easiest part to go overboard on and mess up - so make sure you have almost none on the brush and you are only applying the lightest of pressure - go back and do several passes, building up each time until you are happy instead of going in heavy to begin with.
The final touch is a fine line of pure white painted onto the actual light source with a detail brush - it doesn't need much - just a touch.
Here is a sneak peek of the model in its current state - finished pics coming soon.


Nice, Chris! Can't wait to see him at BW. Great tutorial too, will definitely use this for plasma.
ReplyDeleteHave you ever done a tutorial on rust? It looks awesome.
Nice tutorial, and whats more, I have all of those paints! I'll give this a go when I get back to the weeman room!
ReplyDeleteThanks for the stage by stage, I'll re-post over at Faeit212 Community site if you want.
Go for it Siph.
ReplyDeleteHi Alex - that will be coming soon - just need to finish the model I am using as an example.
Nice tutorial and the results look great.
ReplyDelete